Introduction
Since the Xposed development tutorials on the web are too broken, KyuubiRan decided to write a tutorial to help all developers who want to develop/are developing Xposed modules.
Before you start
You need to be prepared to.
- A phone where Xposed framework can be installed (LSPosed, Android 10+ recommended)
- A computer that can write code and has jdk installed.
- A software named Android Studio (of course you can use IDEA without any problem)
- A decompiler, e.g., JADX
- An app where you can view the layout, e.g. Developer’s Assistant
Secondly, this article assumes that you have learned the following.
- Will Java/Kotlin one of the languages (Kotlin is highly recommended, especially friendly to module development, for this reason I wrote a kotlin Xposed module development with library to use, can help developers save 30% ~ 50%) or even more code, and focus on writing the logic of the module itself! (But this tutorial will not be used is)
- Reflection of Java
- Android’s basic suite (such as Context, View, etc., in fact, these two are enough, can already do a lot)
Preparation
Create project & introduce dependencies
First, we open Android Studio to create an empty project without any Activity, the language is created by personal preference, I will talk about both anyway.
Then, we need to introduce the Xposed library, but it is not uploaded to MavenCentral, so we need to change it in settings.gradle (gradle 7.0+)
dependencyResolutionManagement {
    repositoriesMode.set(RepositoriesMode.FAIL_ON_PROJECT_REPOS)
    repositories {
        google()
        mavenCentral()
        maven { url 'https://api.xposed.info/' }  // Just add this line
    }
}
After that, go to build.gradle in our app directory and introduce the xposed dependencies, but of course you can also remove all dependencies to make the installer smaller
dependencies {
    compileOnly 'de.robv.android.xposed:api:82'
    // compileOnly 'de.robv.android.xposed:api:82:sources'
    // don't import the source code, it will cause the idea to fail to index the files, thus making the syntax hint invalid
}
If you remove all the dependencies and keep only Xposed, you will find that your project cannot be built and will report an error directly! No problem, let’s fix it.
- Remove the themes in
src/res/values/themes.xml(note that there is also a night mode, in the values-night folder) - Remove the
AndroidManifest.xmlfrom the<application ... />in theandroid:theme="xxx"line After removing it, you can build it. Let’s continue, we need to create a module scope file, create a resource file calledarraysin thevaluesdirectory, it will look like this.
<resources>
    <string-array name="xposedscope" >
        <! -- Fill in the package name of the module's scope application here, you can fill in more than one. -->
        <item>me.kyuubiran.xposedapp</item>
    </string-array>
</resources>
Finally, we edit the launch configuration in Run, check Always install with package manager and change Launch Options to Nothing
Declaring the module
After doing the previous step, we need to declare it as an Xposed module so that the framework can discover it and so that we can activate the module.
Back in the AndroidManifest.xml file, we change the <application ... /> to the following form (note that it’s changed! That is, replace the /> at the end with > </application>)
<application ... >
        <!-- Whether to be an Xposed module (specify true) -->
        <meta-data
            android:name="xposedmodule"
            android:value="true"/>
        <!-- Introduction to the module (shown in the framework) -->
        <meta-data
            android:name="xposeddescription"
            android:value="I am Xposed Module Introduction" />
        <!-- The minimum supported Api version of the module is usually 54. -->
        <meta-data
            android:name="xposedminversion"
            android:value="54"/>
        <!-- Module Scopes -->
        <meta-data
            android:name="xposedscope"
            android:resource="@array/xposedscope"/>
</appication>
Then create a folder called assets in the src/main directory and create a file called xposed_init, Note that it has no suffix!!! **.
Next we need to create an entry class called MainHook (or whatever you want to call it), create it and go back to our xposed_init and open it as a text file, enter the full path to the class we just created. E.g. me.kyuubiran.xposedtutorial.MainHook, and **note the case.
This concludes the part where we declare the module! How about that, and then we get to the exciting part of writing the module!
Module writing
MainHook
Coming to our MainHook, first we need to implement the following Xposed’s IXposedHookLoadPackage interface in order to perform the Hook operation. This is done as follows
Java:
package me.kyuubiran.xposedtutorial;

import de.robv.android.xposed.IXposedHookLoadPackage;
import de.robv.android.xposed.callbacks.XC_LoadPackage;

public class MainHook implements IXposedHookLoadPackage {
    @Override
    public void handleLoadPackage(XC_LoadPackage.LoadPackageParam lpparam) throws Throwable {
        // Filtering unnecessary applications
        if (!lpparam.packageName.equals("me.kyuubiran.xposedapp")) return;
        // Execute Hook
        hook(lpparam);
    }

    private void hook(XC_LoadPackage.LoadPackageParam lpparam) {
        // Specific hook code
    }
}
Kotlin:
package me.kyuubiran.xposedtutorial

import de.robv.android.xposed.IXposedHookLoadPackage
import de.robv.android.xposed.callbacks.XC_LoadPackage

class MainHook : IXposedHookLoadPackage {
    override fun handleLoadPackage(lpparam: XC_LoadPackage.LoadPackageParam) {
        // Filtering unnecessary applications
        if (lpparam.packageName != "me.kyuubiran.xposedapp") return
        // Execute Hook
        hook(lpparam)
    }

    private fun hook(lpparam: XC_LoadPackage.LoadPackageParam) {
        // Specific hook code
    }
}
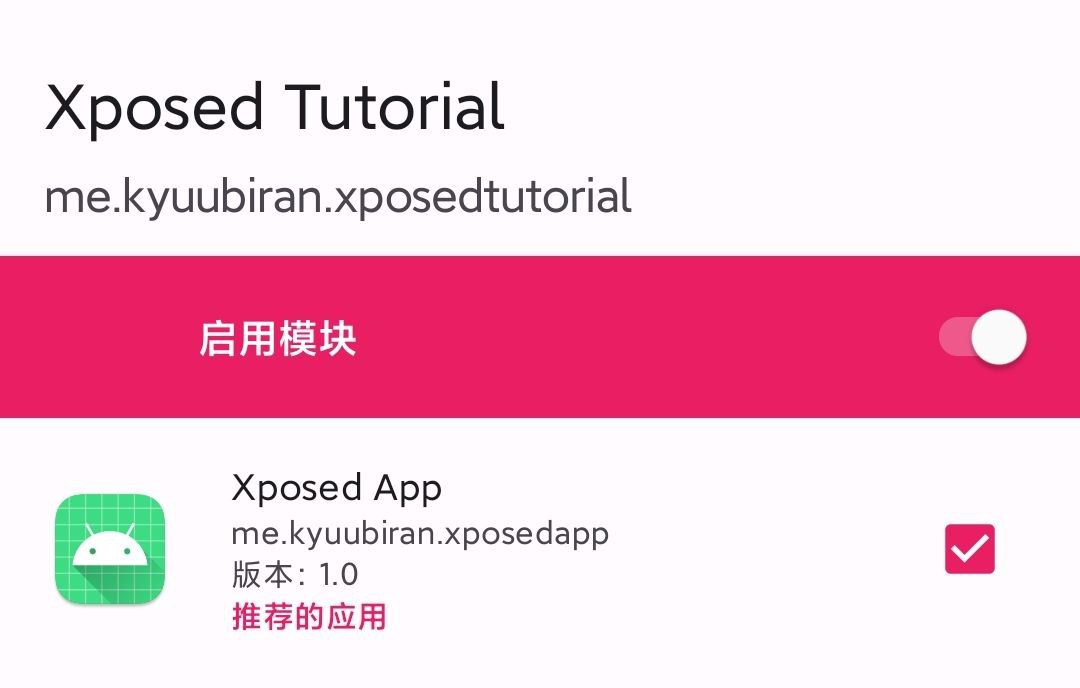
Here, our preparations are complete, install the module and activate it in the framework!
Decompile
Finally it’s time for us to decompile the apk to find the hook point! I have a copy of the guessing game apk here, and today I what we are going to do is become Gambling Sage (
Let’s start by opening jadx-gui, select our guess.apk, and wait for him to finish loading, which means the decompilation is done.
Next, we open the app and see what its current layout is (I’m using Developer Assistant Pro here)
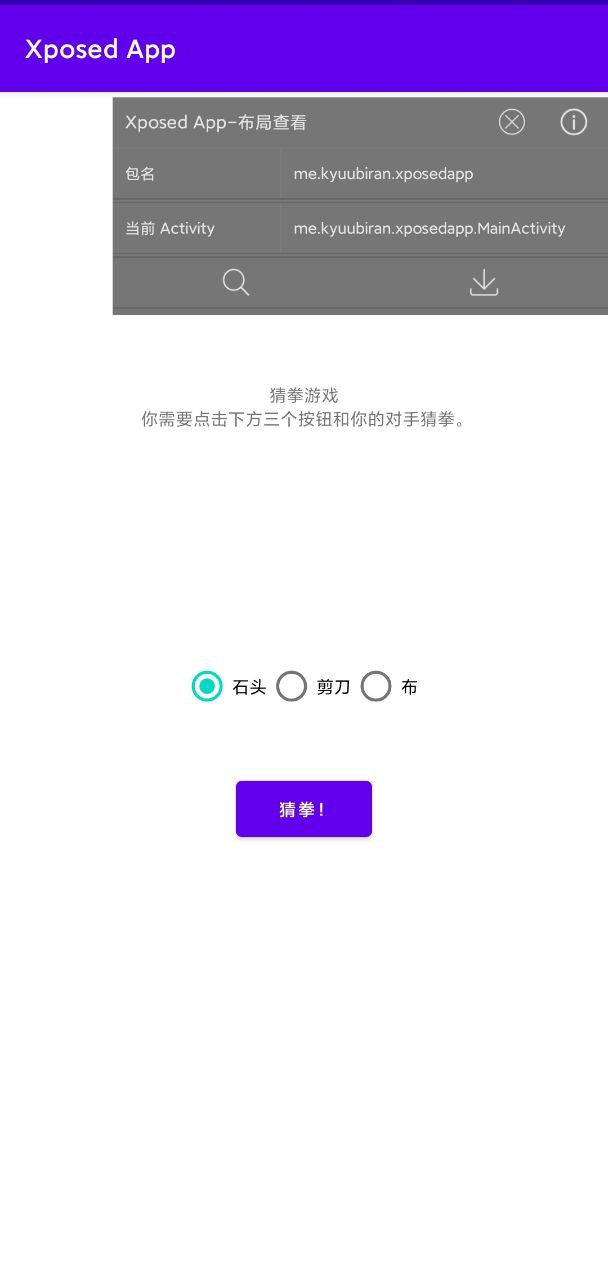
As you can see, we are now at me.kyuubiran.xposedapp.MainActivity, then go back to our jadx, expand and find this Activity in turn, like this.
Hook activity
Our most basic hook is to use the XposedHelpers.findAndHookMethod that comes with Xposed, which is used as follows.
Java:
private void hook(XC_LoadPackage.LoadPackageParam lpparam) {
    // It has two overloads, the difference is that one fills in the Class and the other fills in the ClassName and ClassLoader
    // The first one fills in ClassName
    XC_MethodHook.Unhook unhook = XposedHelpers.findAndHookMethod("me.kyuubiran.xposedapp.MainActivity", // className
            lpparam.classLoader, // classLoader Use lpparam.classLoader
            "onCreate", // the method to hook
            Bundle.class, // parameter list of the method to be hooked, separated by commas if there are multiple methods
            new XC_MethodHook() { // the last callback to fill in the hook
                @Override
                protected void beforeHookedMethod(MethodHookParam param) {} // before the Hook method is executed
                @Override
                protected void afterHookedMethod(MethodHookParam param) {} // After the Hook method is executed
            });
    // It returns an unhook which can be called to unhook when you don't need to continue hooking
    unhook.unhook(); // unhook the empty Hook

    // The second way is to fill in the Class
    // First you have to load its class. We use XposedHelpers.findClass. There are two parameters, one for the class name and one for the class loader
    Class<? > clazz = XposedHelpers.findClass("me.kyuubiran.xposedapp.MainActivity", lpparam.classLoader);
    XposedHelpers.findAndHookMethod(clazz, "onCreate", Bundle.class, new XC_MethodHook() {
        @Override
        protected void afterHookedMethod(MethodHookParam param){
            // Since we need to pop up the Toast after the Activity is created, after the execution of our Hook method
            Toast.makeText((Activity) param.thisObject, "Module loaded successfully!" , Toast.LENGTH_SHORT).show();
        }
    });
}
Kotlin:
private fun hook(lpparam: XC_LoadPackage.LoadPackageParam) {
    // It has two overloads, the difference is that one fills in the Class and the other fills in the ClassName and ClassLoader
    // The first one fills in the ClassName
    val unhook = XposedHelpers.findAndHookMethod("me.kyuubiran.xposedapp.MainActivity", // className
        lpparam.classLoader, // classLoader Use lpparam.classLoader
        "onCreate", // the method to hook
        Bundle::class.java // parameter list of the method to be hooked, separated by commas if there is more than one
        object : XC_MethodHook() { // The last callback to fill in the hook
            override fun beforeHookedMethod(param: MethodHookParam) {} // Before the Hook method is executed
            override fun afterHookedMethod(param: MethodHookParam) {} // After the Hook method is executed
        })
    // It returns an unhook which can be called to unhook when you don't need to continue hooking
    unhook.unhook() // unhooks the empty hook

    // The second way is to fill in the Class
    // First you have to load its class. We use XposedHelpers.findClass. There are two parameters, one for the class name and one for the class loader
    val clazz = XposedHelpers.findClass("me.kyuubiran.xposedapp.MainActivity", lpparam.classLoader)
    // It is equivalent to merging the first and second parameters, so it is used in the following way.
    XposedHelpers.findAndHookMethod(clazz, "onCreate", Bundle::class.java, object : XC_MethodHook() {
        override fun afterHookedMethod(param: MethodHookParam) {
          // Since we need to pop up the Toast after the Activity is created, after the execution of our Hook method
          Toast.makeText(param.thisObject as Activity, "Module loaded successfully!" , Toast.LENGTH_SHORT).show()
        }
    })
}
where param.thisObject represents the object that calls this method (if it is a static method, it may be null), we hook is the onCreate method of Activity, call it naturally is this Activity, so we put param.thisObject forced to convert to Activity type and we can throw it to Toast to makeText!
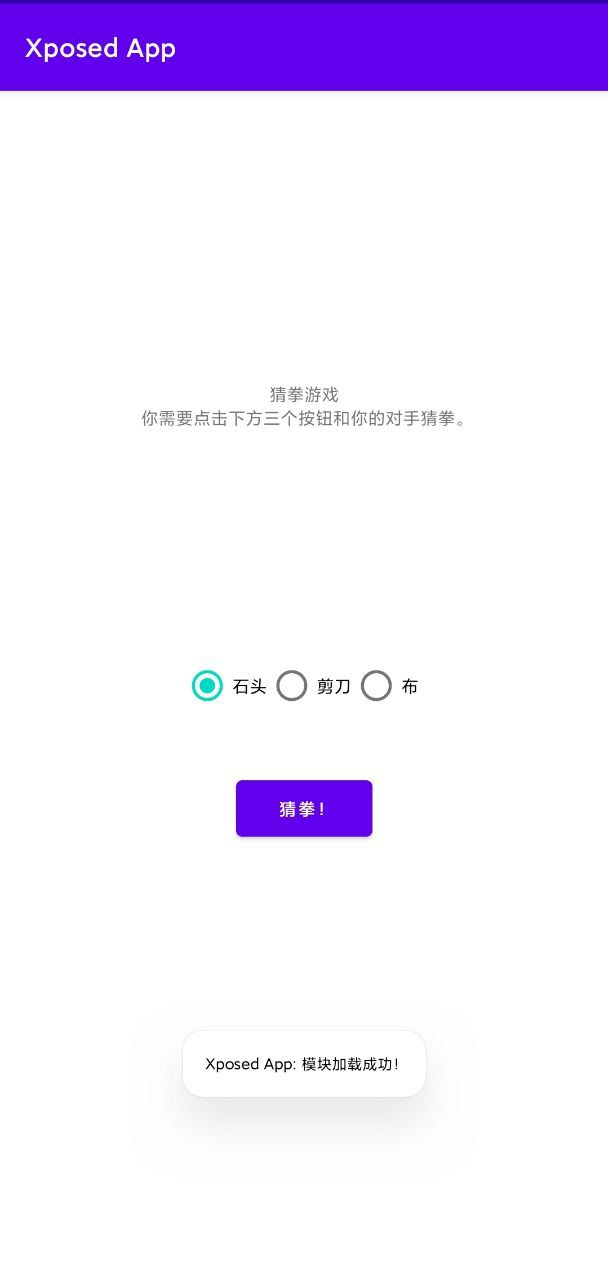
Install the Xposed module and check it, if the Toast pops up, your module is already in effect!
Hook Other categories
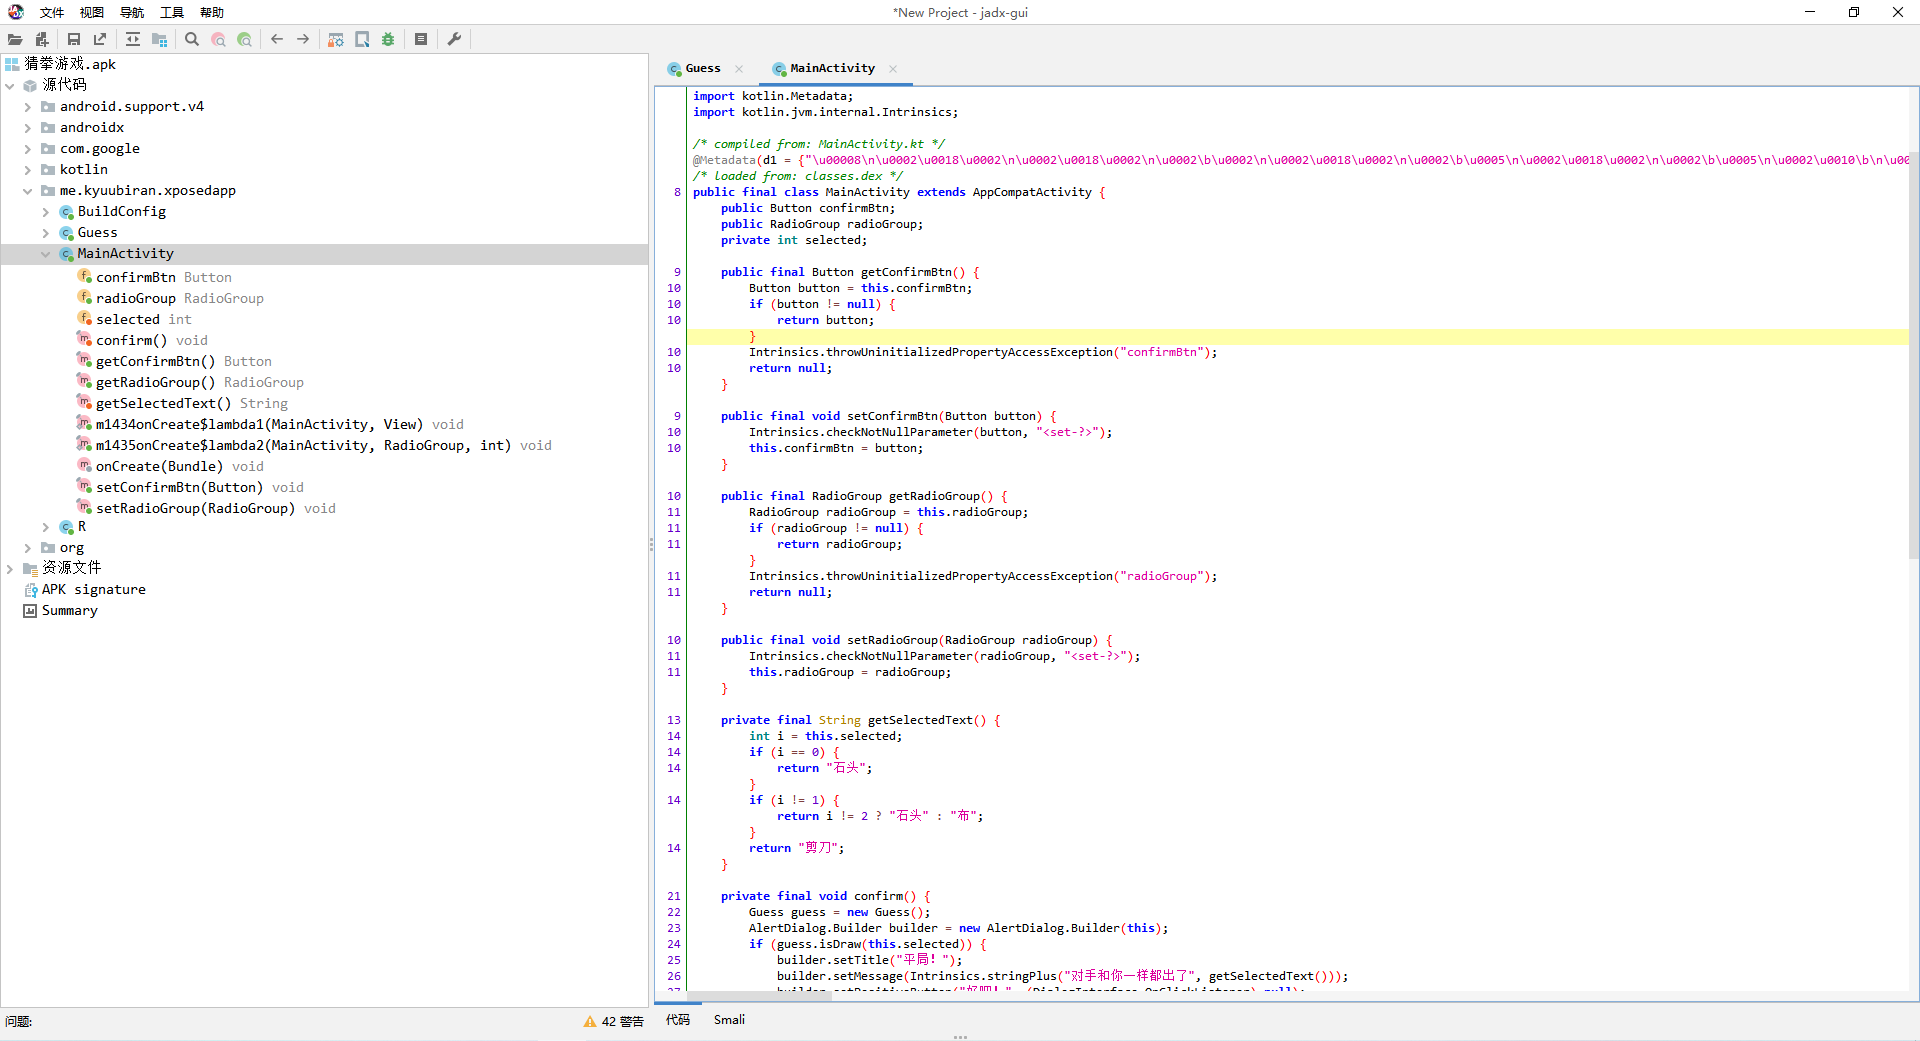
Finally, it’s time for us to become a gambler! We need to analyze the code first, we can see that there is a confirm method inside the MainActivity, which contains the logic to determine our winner and loser.
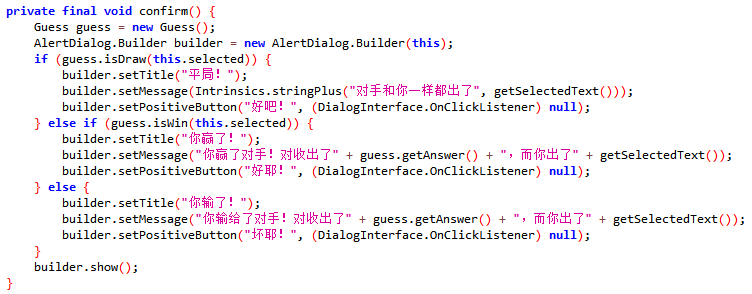
Then look, it new a Guess object inside, we CTRL+left mouse button click on the Guess class to see.
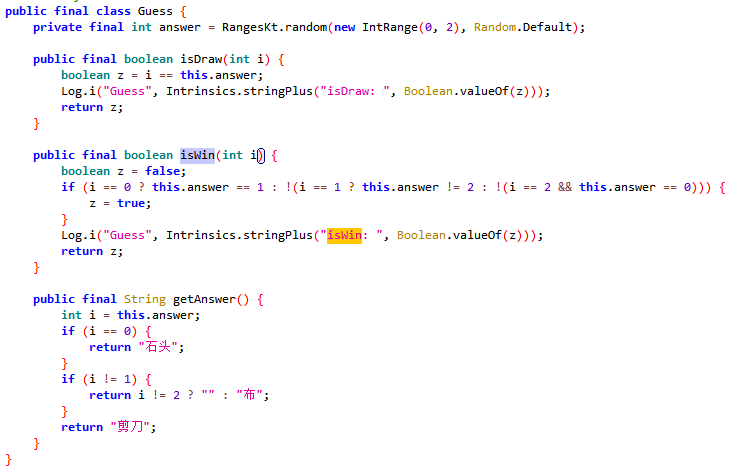
As you can see, there is an isDraw and isWin in there to determine our wins and ties, so next we need to hook these two methods!
Java:
private void hook(XC_LoadPackage.LoadPackageParam lpparam) {
    XposedHelpers.findAndHookMethod("me.kyuubiran.xposedapp.Guess",
            lpparam.classLoader,
            "isDraw",
            int.class, // If the parameter is the host class, you can use findClass to load that class or fill in the full name of that class!
            new XC_MethodHook() {
                @Override
                protected void beforeHookedMethod(MethodHookParam param) {
                    // Set the return value to false to indicate we're not tied
                    param.setResult(false);
                }
            });
    XposedHelpers.findAndHookMethod("me.kyuubiran.xposedapp.Guess",
            lpparam.classLoader,
            "isWin",
            int.class,
            boolean.class,
            new XC_MethodReplacement() { // another callback that replaces the method directly with what you want to execute (actually it's a wrapped beforeHook, which is basically not used)
                @Override
                protected Object replaceHookedMethod(MethodHookParam param) {
                    return true;
                }
            });
}
Kotlin:
private fun hook(lpparam: XC_LoadPackage.LoadPackageParam) {
    XposedHelpers.findAndHookMethod(
        "me.kyuubiran.xposedapp.Guess",
        lpparam.classLoader,
        "isDraw",
        Int::class.java, // If the parameter is the host class, you can use findClass to load that class or fill in the full name of that class!
        object : XC_MethodHook() {
            override fun beforeHookedMethod(param: MethodHookParam) {
                // Set the return value to false to indicate that we are not tied
                param.result = false
            }
        })
    XposedHelpers.findAndHookMethod("me.kyuubiran.xposedapp.Guess",
        lpparam.classLoader,
        "isWin",
        Int::class.java,
        object : XC_MethodReplacement() { // another callback that replaces the method directly with what you want to execute (actually it's a wrapped beforeHook, basically not used)
            override fun replaceHookedMethod(param: MethodHookParam): Any {
                // return true directly
                return true
            }
        })
}
After modifying the code we reinstall the module and launch the app, and we find that whether we should have lost or tied, it counts as a win for us!
You win the game, but it’s obvious to everyone else! Next I’ll show you how to get your opponent to “play along” with you!
First, let’s look at the code for clicking the Guess button and see that isDraw is executed first, and the answer inside Guess is created after the class is instantiated, and it doesn’t have a method for us to hook, so we have to use our reflection!
Since isDraw is executed first, we need to use reflection before isDraw is executed to “steal”, without further ado on the code!
Java:
private void hook(XC_LoadPackage.LoadPackageParam lpparam) {
    XposedHelpers.findAndHookMethod("me.kyuubiran.xposedapp.Guess",
            lpparam.classLoader,
            "isDraw",
            int.class,
            new XC_MethodHook() {
                @Override
                protected void beforeHookedMethod(MethodHookParam param) {
                    try {
                        // first we need to get his field
                        Field fAnswer = param.thisObject.getClass().getDeclaredField("answer");
                        // and make it accessible otherwise an illegal access error will be reported
                        fAnswer.setAccessible(true);
                        int win = 0;
                        // according to the logic of the guessing application 0 is rock 1 is scissors 2 is cloth
                        switch ((int) param.args[0]) { // first we get the first parameter of the method He is of type int
                            case 0: // Rock -> Scissors
                                win = 1;
                                break;
                            case 1: // Scissors -> Cloth
                                win = 2;
                                break;
                            case 2: // Cloth -> Rock
                                win = 0;
                                break;
                        }
                        // Finally set the value of answer to let the opponent "act" according to our punches
                        fAnswer.set(param.thisObject, win);
                    } catch (Exception ignored) {
                    }
                }
            });
}
Kotlin:
private fun hook(lpparam: XC_LoadPackage.LoadPackageParam) {
    XposedHelpers.findAndHookMethod(
        "me.kyuubiran.xposedapp.Guess",
        lpparam.classLoader,
        "isDraw",
        Int::class.java,
        object : XC_MethodHook() {
            override fun beforeHookedMethod(param: MethodHookParam) {
                // First we need to get his fields
                val fAnswer = param.thisObject.javaClass.getDeclaredField("answer")
                // and make it accessible, otherwise it will report an illegal access error
                fAnswer.isAccessible = true
                // according to the logic of the guessing application 0 is rock 1 is scissors 2 is cloth
                val win = when (param.args[0] as Int) { // first we get the first argument to the method which is of type Int which is our punch
                    0 -> 1 // Rock->Scissors
                    1 -> 2 // Scissors-> Cloth
                    2 -> 0 // Cloth -> Stone
                    else -> 0
                }
                // Finally set the value of answer to let the opponent "act" according to our punches
                fAnswer.set(param.thisObject, win)
            }
        })
}
Reinstall and run, perfect! Now our opponents will match our punches to deliberately give us the win! From now on, you’re a gambling saint!
Another way
Xposed actually provides another way to do Hook, which is to use XposedBridge.hookMethod.
There is basically no big difference, except that the method is something you look for yourself, for example.
Java:
private void hook(XC_LoadPackage.LoadPackageParam lpparam) {
    Class<?> clz = XposedHelpers.findClass("me.kyuubiran.xposedapp.MainActivity", lpparam.classLoader);
    for (Method m : clz.getDeclaredMethods()) {
        if (m.getName().equals("onCreate")) {
            XposedBridge.hookMethod(m, new XC_MethodHook() {
                @Override
                protected void afterHookedMethod(MethodHookParam param) {
                    Toast.makeText((Activity) param.thisObject, "I Hooked the onCreate method of MainActivity again!", Toast.LENGTH_SHORT).show();
                }
            });
        }
    }
}
Kotlin:
private fun hook(lpparam: XC_LoadPackage.LoadPackageParam) {
    val clz = XposedHelpers.findClass("me.kyuubiran.xposedapp.MainActivity", lpparam.classLoader)
    for (m in clz.declaredMethods) {
        if (m.name == "onCreate") {
            XposedBridge.hookMethod(m,object : XC_MethodHook() {
                override fun afterHookedMethod(param: MethodHookParam) {
                    Toast.makeText(param.thisObject as Activity,"I Hooked the onCreate method of MainActivity again!",Toast.LENGTH_SHORT).show()
                }
            })
        }
    }
}
End
This is the tutorial for getting started with Xposed, and it should be the most friendly tutorial so far, basically everything that should be said (although the nonsense may be a bit too much) is left to see what happens (
Q & A
Q1: When to use beforeHook, when to use afterHook, what is the difference between them?
A1: You can think of before as before the first line of the method is executed, and after as after the last line of the method is executed and ready to return. If you want to modify the parameters, then use before, if you want to modify the return value, then use after, if you do not need the method execution directly end the method, then use before, of course, they can be used at the same time, depending on the circumstances. Comprehensive above, the basic use before on the line.